Thursday, April 28, 2011

Carrot Cake with Toasted Coconut Cream Cheese Frosting


This was one of two desserts I made for our family gathering on Easter weekend. Although I prefer a layered carrot cake, I opted for one that was easy to throw together and not so rich.


I think that this cake is proof that you can have a wonderful, sweet, and tasty dessert without all the extra fat and calories. It is a lighter cake, yet moist and delicious. I especially like the addition of baby food, which allows you to use less oil/butter and contributes to the moisture in the cake.

My next post will include the second dessert I made, a Strawberry Cream Cake.

Carrot Cake with Toasted Coconut Cream Cheese Frosting
Adapted from Cooking Light

Ingredients
Cake:
  • 3/4 cup all-purpose flour (about 3 1/3 ounces)
  • 1/4 cup quick-cooking oats
  • 1 1/2 teaspoons ground cinnamon
  • 1 teaspoon baking powder
  • 1/2 teaspoon baking soda
  • 1/4 teaspoon salt
  • 1 cup granulated sugar
  • 1/4 cup canola oil
  • 1 (2 1/2-ounce) jar carrot baby food
  • 2 large eggs, lightly beaten
  • 1 1/4 cups finely grated carrot (about 4 ounces)
  • 1/2 cup raisins
  • Cooking spray

Frosting:
  • 1/3 cup (3 ounces) 1/3-less-fat cream cheese, softened
  • 1 tablespoon butter, softened
  • 1 1/4 cups powdered sugar, sifted
  • 1/2 teaspoon vanilla extract
  • 1/4 cup flaked sweetened coconut, toasted

Preparation
Preheat oven to 325°.
To prepare cake, lightly spoon flour into dry measuring cups; level with a knife. Combine flour and next 5 ingredients (through salt) in a food processor; pulse 6 times or until well blended. Place flour mixture in a large bowl. Combine granulated sugar, canola oil, baby food, and eggs; stir with a whisk. Add to flour mixture; stir just until moist. Stir in grated carrot and raisins. Spoon batter into an 8-inch square baking pan coated with cooking spray.
Bake at 325° for 40 minutes or until a wooden pick inserted in center comes out clean. Cool in pan on a wire rack.
To prepare frosting, combine cheese and butter in a large bowl. Beat with a mixer at high speed until creamy. Gradually add powdered sugar and vanilla, beating at low speed until smooth (do not overbeat). Spread over cake; sprinkle with coconut. Cover and chill.

Note: You can either frost the cake in the pan or before pouring your batter into the pan, line with foil, being sure to grease the foil well. Allow to cool, invert on to serving dish, carefully peeling off foil.

Yield: 12 servings; Calories, 262

Wednesday, April 27, 2011

Big Fat Wednesday


It's been a while since I've posted pictures of "our girl." So, allow me to brighten your day with this happy face. Didn't I tell you she was looking forward to spring?


She has been so happy to get out of the house, go on a few hikes, lots of walks and lots of throwing ball. With such a full schedule, I don't believe she has had time to follow the preparations for the royal wedding.


Speaking of hikes... look at that smile! Corgi's are herding dogs, so when we are on the trail she is busy the whole time shepherding her hiking buddies. Busily alternating from the stragglers at the back to the head of the pack, she looks back wondering what's taking so long. On this particular hike, when we got to the top, we hoisted her on to the rock so she could see the view too. We laughed at her because she kept pacing, trying to find a way to get down. She did take out a little time from her anxiety to smile for the camera!

Monday, April 25, 2011

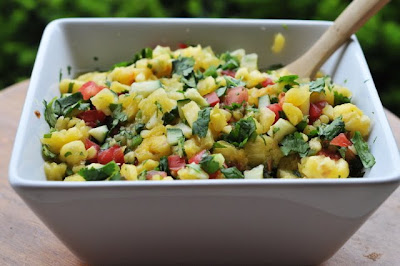
Pineapple Salsa


It has been a busy couple of weeks around here. Last weekend we had a bridal shower for my future-daughter-in-law (more on the upcoming nuptials later). This weekend we had lots of family in and a big Easter meal here on Friday night. This salsa was a part of both weekends. We enjoyed it at the shower and then again on Friday night as an appetizer.


Made with all fresh ingredients, this salsa can be used as an appetizer with tortilla chips. Or, it would be wonderful on grilled chicken or fish.


Ordinarily, I would dread the messy task of cutting up a pineapple.


Fortunately, we live in a day and time (and I might add, we are slightly spoiled), that we can use such a thing as a Pineapple Wedger. It really makes short work of the whole process.


I was tempted to stop the process right here and just serve the fresh pineapple.


But the finished product was so worth it.


Here you see my sweet niece enjoying her pineapple salsa appetizer with my slightly deranged brother-in-law in the background! A good time was had by all!

Pineapple Salsa

Ingredients
  • 2 plum tomato
  • 1/2 medium red onion (whole)
  • 1 4-in. piece seedless cucumber
  • 1/2 cup cilantro leaves
  • 1 Jalapeno Pepper
  • 1/2 fruit pineapple (raw)
  • 1 lime
  • 1/2 tsp salt

Directions
Hull and remove seeds from tomatoes. Dice tomatoes, onion and cucumber. Chop cilantro. Combine tomatoes, onion, cucumber and cilantro in bowl. Cut jalapeno in half lengthwise and remove seeds. Finely chop jalapeno, add to bowl.

Slice top and bottom off of pineapple, creating a flat base. Core and peel. Set aside half of the pineapple for another use. Dice pineapple flesh. Juice lime to measure about 2 tbsp juice. Add pineapple, lime juice and salt to bowl. 

Mix thoroughly until combined. Serve with Lime Tortilla Chips.

Yield - 16 servings. Calories - 20; per serving (3 Tbls.)

This post has been linked to Eat at Home

Monday, April 18, 2011

Peanut Butter Cup Cheesecake


Rich, outrageous, peanut buttery, chocolaty, cheesecake—goodness!

Not that you really need a reason to make a cheesecake like this—but this decadent dessert was made for a purpose. My youngest son has been competing with a Lego Robotics team for 2 years now. The team was promised a cheesecake after their very first competition at regionals, two years ago. They had been waiting ever since.

Celebrating at Krispy Kreme after regionals. Can you guess which son is mine?

This year, back in December, the team won the regional competition, then went on to compete at the state level. They of course mentioned the cheesecake again. We had our end-of-the-year party last week and they finally, at long last, got their cheesecake!

This cheesecake starts with a crust which includes graham crackers and oreos.


Next comes a layer of peanut butter. (Off to a good start wouldn't you say?).


Then comes your cheesecake layer.

How 'bout a bit of fudge topping…?


swirled into the cheesecake layer!


Out of the oven just waiting for another layer of fudge topping and garnished with peanut butter cups.


See all the yummy layers!


And here is the robotics team at the party. Finally—enjoying their cheesecake! The boy in the middle is mine. Did you guess that?


Peanut Butter Cup Cheesecake
Adapted from Taste of Home

Ingredients
  • 1-1/4 cups graham cracker crumbs
  • 1/4 cup sugar
  • 1/4 cup crushed cream-filled chocolate sandwich cookies
  • 4 tablespoons butter, melted
  • 3/4 cup creamy peanut butter

FILLING:
  • 3 packages (8 ounces each) cream cheese, softened
  • 1 cup sugar
  • 1 cup (8 ounces) Sour Cream
  • 1-1/2 teaspoons vanilla extract
  • 3 eggs, lightly beaten
  • 1 cup hot fudge ice cream topping, divided
  • 6 peanut butter cups, cut into small wedges

Directions
In a large bowl, combine the cracker crumbs, sugar, cookie crumbs and
butter. Press onto the bottom and 1 in. up the sides of a greased 9-in. springform pan. Place on a baking sheet.
Bake at 350° for 7-9 minutes or until set. Cool on a wire rack.
In a microwave-safe bowl, heat peanut butter on high for 30 seconds
or until softened. Spread over crust to within 1 in. of edges.
In a large bowl, beat cream cheese and sugar until smooth. Beat in
sour cream and vanilla. Add eggs; beat on low speed just until
combined.
In a microwave, heat 1/4 cup fudge topping on high for 30 seconds or
until thin. Carefully pour over filling; cut through with a knife to swirl.
Return pan to baking sheet. Bake at 350° for 55-65 minutes or
until center is almost set. Cool on a wire rack for 10 minutes.
Carefully run a knife around edge of pan to loosen; cool 1 hour
longer.
Microwave remaining fudge topping for 30 seconds or until warmed;
spread over cheesecake. Garnish with peanut butter cups. Refrigerate
overnight. Refrigerate leftovers.

Yield: 12-14 servings.

Tuesday, April 12, 2011

How to Cook and Eat an Artichoke


Having been born and raised in California, I was exposed to eating lots and lots of artichokes. Since moving to the Bluegrass State I have come to the realization that they are not as popular in "these parts" as they are out west. I have been amazed and dismayed at how many people I have run across who have never eaten an artichoke. I'm talking about eating a real, whole, fresh artichoke, not just those that you find in a say—artichoke and spinach dip.

Coming from the thistle family they are actually a flower. Such a unique vegetable is interesting to eat as you make your your way "petal by petal" to the very "heart." They are a powerhouse of nutrients and a meager 60 calories per artichoke.

So, relax, sit back, and enjoy this step by step tutorial and then promise me you'll run out and buy one and try it. The following is the most basic way to prepare an artichoke. These vegetables are so versatile and fun to prepare other ways as well.


Trim bottom stem from artichoke. Place them in a large pot filling with water about half way up (as you see in the photo). Bring to a boil and simmer, covered, 30 - 40 minutes or until you can easily pull off outer leaves with tongs.


Remove from pan and set on plate, or serving dish.


Peel off a leaf, dip the underside in butter.


The soft underside of the leaf has a delicate, delicious flavor. It sounds strange to say it, but scrape off the leaf with your teeth. Discard the rest.

Continue with leaves, dipping in butter and scraping.


The leaves will become softer as you go and are still edible. You'll be sorry to be running out of them, but the best part is yet to come!

When you get closer to the "choke" you may discard the remaining leaves.

The "choke" is the cluster of immature florets at the very center of the artichoke, having a purple tint to them. They are not edible.


Scrape or spoon off to reveal the "heart." They come off easily.


This picture reveals half of the heart. The florets still remain on the other half.

This is the succulent heart of the artichoke. You can either dip in butter or melt a little pool right in the middle.

Enjoy!

Note: Artichokes cause some debate in my household. My husband likes to dip his in mayonnaise, I say they are better with butter (as is everything else—right)? Be sure to tell me which way you like it!

Friday, April 8, 2011

Carrot Cake Pancakes


I don't think I've ever met a pancake that I didn't like. While growing up my Uncle used to make his "famous" buckwheat pancakes. I loved them and would eat a huge stack. I have had pancakes in all shapes and sizes, fruit in them, fruit on top, various types of syrup (boysenberry - yum)! But, never before have I had Carrot Cake pancakes.


These were different, yet fantastic! The most time-consuming part of this recipe is shredding the carrots. It is a cinch if you have a food processor, if not, you might consider purchasing some pre-shredded carrots.


We really loved these. I was tempted to use syrup instead of the honey butter, I'm so glad I didn't, the honey butter added the perfect amount of sweetness to them. It really was the perfect carrot cake in pancake form!

This post has been linked to Eat at Home.

Carrot Cake Pancakes
Adapted from Cooking Light

Ingredients
1 1/4 cups all-purpose flour
1/4 cup chopped walnuts, toasted
2 teaspoons baking powder
1 1/2 teaspoon ground cinnamon
1/4 teaspoon salt
1/4 teaspoon freshly ground nutmeg
1/8 teaspoon ground cloves
1/8 teaspoon ground ginger
1/4 cup brown sugar
3/4 cup low-fat buttermilk
1 tablespoon canola oil
1 teaspoons vanilla extract
2 large eggs, lightly beaten
2 cups finely grated carrot (about 1 pound)
Cooking spray
3 tablespoons butter, softened
2 tablespoons honey

Directions
Spoon flour into dry measuring cups, and level with a knife. Combine flour and next 7 ingredients (through ginger) in a large bowl, stirring with a whisk. Combine 1/4 cup brown sugar and next 4 ingredients (through eggs); add sugar mixture to flour mixture, stirring just until moist. Fold in 2 cups carrot.
Heat a large nonstick skillet over medium heat. Coat pan with cooking spray. Spoon 4 (1/4 cup) batter mounds onto pan, spreading with a spatula. Cook for 2 minutes or until tops are covered with bubbles and edges look cooked. Carefully turn pancakes over; cook 1 minute or until bottoms are lightly browned. Repeat procedure twice with remaining batter. Combine butter and honey in a small bowl; serve with pancakes.

Yield - 6 servings (2 pancakes and about 2 teaspoons honey butter); Calories 315

Wednesday, April 6, 2011

Spinach-and-Brie Chicken with Tomato Orzo


There are times when I try something new in the kitchen and the task seems daunting to me. I become filled with doubt and questions. In the case of this chicken recipe, here were the questions and fears cluttering my head: What if I don't cut the chicken thin enough? What if I don't roll it right and it looks horrible? How will I know when it's cooked through? What if the cheese melts all over the place?


Silly, I know. I'm such a worrier. I am happy to have "blazed the trail," so to speak, with this recipe and answer all those questions for you so you my dear reader, will run to your kitchen and make this. It was so worth it and really quite simple.


First I used 3 regular chicken breasts that I cut in half horizontally or lengthwise. No problem, just use a good knife.


As the directions say, be sure to roll it up tight, again, no problems there.


I was concerned about the cooking time, because after all, rolled chicken is thick chicken and 8 –10 minutes under the broiler just didn't seem long enough to me. After 10 minutes of broiling I did move the chicken to a lower rack in the oven and lowered the temperature to 350º while I finished preparing the rest of the meal—about 10 minutes. The chicken was done, perfectly!

As for my fear of the cheese melting all over. It did melt some onto the foil, but most of the cheese was held inside and was melty and yummy.

There, hopefully all your fears are relieved now, along with mine. Oh, and are you wondering about the taste? Fantastic! Grab some company, cause they will love it too. Not a Brie lover? No worries, I am anxious to try this dish with other cheeses as well. You could try goat, mozzarella, fontina, gorganzola, etc... If you do try it with other cheeses please comment and let me know how it tasted.

And, speaking of comments, I LOVE to hear from my readers. Please don't be shy, leave a comment. You'll make my day!

Spinach-and-Brie Chicken and Tomato Orzo
Adapted by Martha Stew

Ingredients
  • Coarse salt and ground pepper
  • 3 chicken breasts (about 2 pounds), cut in half, lengthwise
  • 2 tablespoons Dijon mustard
  • 1 package (10 ounces) frozen leaf spinach, thawed and squeezed dry
  • 4 ounces Brie cheese, cut into 8 slices
  • 1 cup orzo
  • 2 plum tomatoes, cored and chopped
  • 1/4 cup chopped fresh parsley
  • 1 tablespoon butter
  • 1 tablespoon fresh lemon juice
Directions
Set a large saucepan of salted water to boil. Heat broiler, with rack set 4 inches from heat. Place chicken on a large rimmed baking sheet lined with aluminum foil. Dividing evenly, spread one side of each cutlet with mustard; top with spinach, then cheese. Season with salt and pepper. Starting at short end, roll chicken up tightly, and arrange, seam side down, on sheet.

Season rolled chicken with salt and pepper. Broil, without turning, until tops are lightly browned and chicken is cooked through, 8 to 10 minutes. Move to lower rack and reduce to 350º for 10 additional minutes.

Meanwhile, cook orzo in boiling water until al dente. Drain well; return to pot. Add tomatoes, parsley, butter, and lemon juice. Season with salt and pepper, and toss to combine. Serve stuffed chicken with orzo.

Yield - 4 servings (6 chicken rolls)

Saturday, April 2, 2011

Field Salad with Snow Peas, Grapes and Feta


It has been so busy around here, since returning from Alaska. We came home to sick kids (they're better now). And, a long "to-do" list, which included planting over 300 seeds for starter plants (indoors) for my summer garden. I planted even more outdoors for my first-ever cold-weather garden. I'm excited to tell you more about my gardening efforts in an upcoming post.

This salad was appealing because it looked so fresh and "spring-like." I really liked the addition of the orange juice in the dressing. It also works great for keeping the calorie count down, as you don't need to use as much oil. The flavors in this salad came together beautifully. My husband commented that the salad seems more like a fresh, healthy dessert. It fits perfectly into any spring menu.

Field Salad with Snow Peas, Grapes, and Feta
Cooking Light

Ingredients:
  • 5 tablespoons white wine vinegar
  • 5 tablespoons fresh orange juice
  • 2 tablespoons extravirgin olive oil
  • 2 1/2 teaspoons sugar
  • 1/2 teaspoon salt
  • 1/4 teaspoon freshly ground black pepper
  • 8 cups gourmet salad greens
  • 2 cups snow peas, trimmed and cut lengthwise into thin strips
  • 2 cups seedless red grapes, halved
  • 1/2 cup (2 ounces) crumbled feta cheese
Directions:
Combine first 6 ingredients in a small bowl; stir well with a whisk. Combine remaining ingredients in a large bowl. Drizzle dressing over salad; toss well.

Note: You can make the dressing up to 2 days ahead.

Yield: 6 servings - Calories 151